This is part 2 of the post about using a Pentaho CTools Community Dashboard Editor (CDE) form to send data to a Pentaho transformation (see Part 1) . This means that we can use a CDE form to allow users to put data into the Pentaho system and it can be used for … anything! Examples might be submitting requests, registering files, adding information, business process inputs and so on.
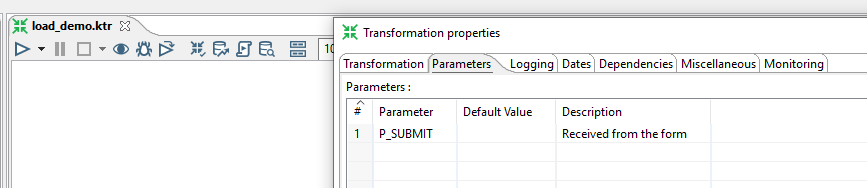
First off, let’s create a new transformation in PDI (Spoon). Open the Parameters (ctrl+t or command+t or double-click on the background. Add a parameter P_SUBMIT. This will be the target for the “P_SUBMIT” JSON string we create in the form when submitting.
On the empty transformation, add in a ‘Get Variables’ step (under the ‘Job’ category in the Design tab on the left-side of the app. Add in the single parameter we just created.
- The column ‘name’ will have what it will be called in the transformation (we’ll call it ‘submit_json’).
- The column ‘variable’ has the parameter name (P_SUBMIT) but we wrap it in ‘${}’ so that Spoon knows that we want to extract the value in it and assign it to ‘submit_json’
- Set the type to ‘String’ (this is the data-type and tells Spoon what operations it will allow – splitting but not muliplication for instance)

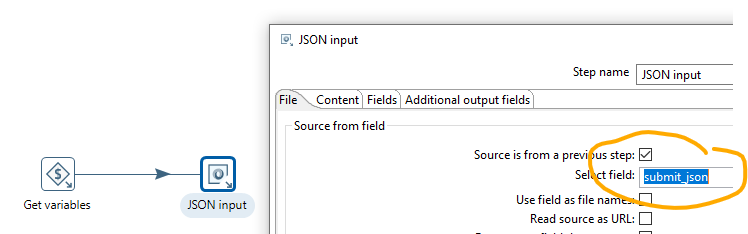
Drag on a ‘JSON Input’ step (under the ‘Input’ category), connect it to ‘Get Variables’ with a ‘connector’ and on the first (File) tab, tick ‘Source is from a previous step’ and select ‘submit_json’ – remembering that ‘submit_json’ will have the JSON from the form submit in it
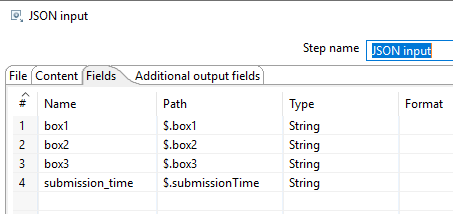
Move to the ‘Fields’ tab and we’ll split the JSON string into the four parts we sent from the form using JSONPath syntax. But first lets have a quick look at the submission string from the form that the P_SUBMIT parameter will receive
 {
	"box1": "red",
	"box2": "fred",
	"box3": "wert",
	"submissionTime": "4_9_2020__7_02_46_AM"
}
The first “{” is the “root” of the JSON snippet(or document) and directly underneath are our four key/value pairs. We want to get “red” and put it into a Spoon field so we can use it later
On the ‘Fields’ tab, the first column is the name of the field we want to extract the variable value into, and the ‘Path’ is the JSONPath instruction where $ is the top node of the JSON and ‘.box1’ tells it the key to extract the value from, and sent into the JSON variable
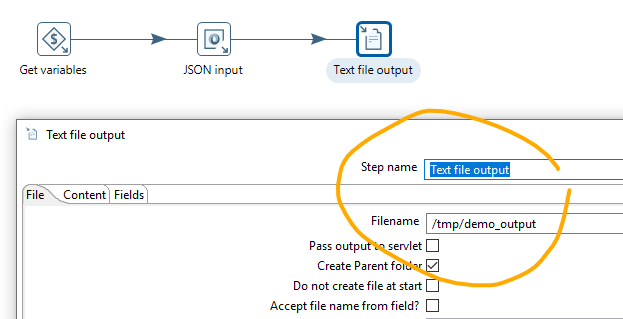
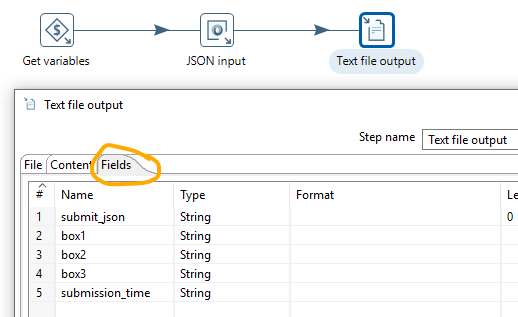
Drag on a ‘Text File Output’ step and connect it to the JSON Input step. Double-click the step to open the edit-dialog. In the ‘file’ tab set an output filename that is available from your Pentaho BA server . In this case since my BA server is installed on Linux, I’ll use the /tmp folder and name the file ‘demo_output’.
Move to the ‘Fields’ tab and add all the fields. These will be the names of the fields and data output to the file
Save the file onto the BA server repository under the folder ‘/public’ and name it ‘load_demo’
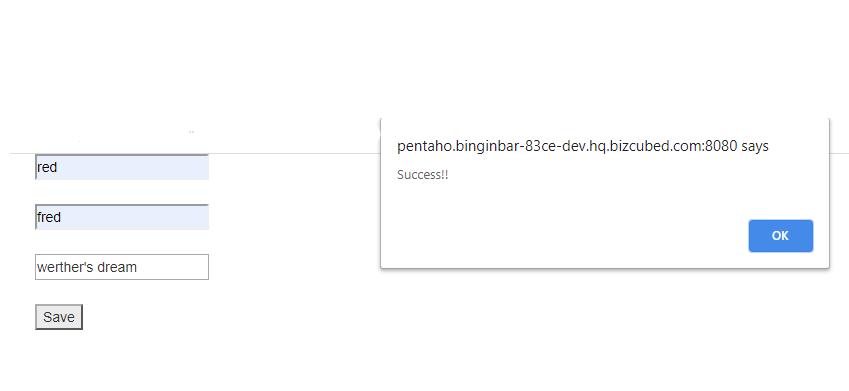
Go back to the form (see Part 1) and enter some data (any text you want) in the boxes and click ‘Save’
Let’s check the file /tmp/demo_output.txt
andrewc@pentaho:/tmp$ cat demo_output.txt
submit_json;box1;box2;box3;submission_time
;red;fred;wert;4_9_2020__7_59_57_AM
Success!
If you would like to send back a message to the web-form (e.g. “success!”), follow these steps.
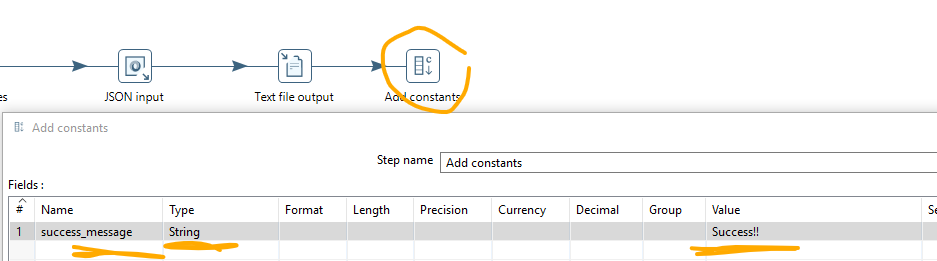
First add an ‘Add Constants’ step (under the Transform category) and connect it to the text box output step. Add a new field called ‘success_message’, make it a ‘String’ and in the ‘Value’ enter our return message “Success!!”
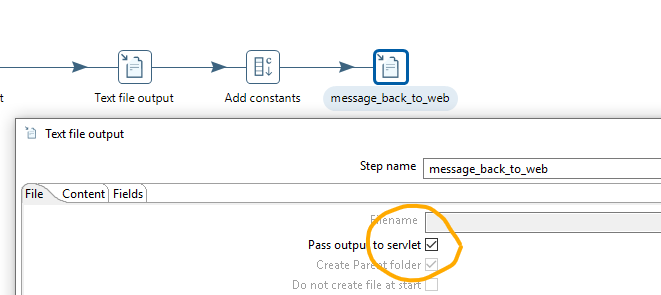
Add in another textbox and connect it to the ‘Add constants’ step and on the ‘Files’ tab, select ‘Pass output to servlet’. This means, that instead of writing the fields defined in the ‘Fields’ tab to a file, it will pass the lines back to the Tomcat server Java servlet that is handling the interface between the form and our transformation so that it can pass them back to the form (where-ever that form might be in the world)
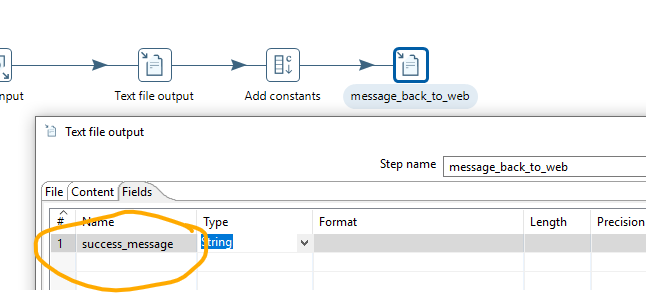
In the ‘Files’ tab, select the ‘success_message’ field and make it a ‘String’ type
Save the transformation then back to our form, enter some data and click ‘Save’. Now the form pops up to tell us ‘Success!!’ which is our message. Of course that can be what ever we like.
With a little more javascript knowledge you can of course make a much more sophisticated webpage and a far more sophisticated back-end…but that’s beyond the scope of this tutorial.
One last tip: The ‘Pass output to servlet’ only works when it runs on the original transformation. If you pass control to other transformations or jobs ( a normal way to tack together a data process ) the server seems to lose track of the original web-call and nothing gets passed back. Of course, you can send the message back and then pass control around, but you won’t be able to return the results in this call. Perhaps you could have another Javascript process periodically do an AJAX call to a different transformation that can check the progress of the original process and send back update messages. I will leave that, as mathematics professors love to say, as an exercise for the reader.

Andrew Cave
Andrew Cave is a senior data engineer with BizCubed. He has worked in network data, billing, telco credit and debt after a career in the welfare sector. He loves databases. Follow him on LinkedIn